Introduction
这章介绍了“霸王龙”操作系统,主要包括 rCore 的文件系统 easy-fs
git clone https://github.com/rcore-os/rCore-Tutorial-v3.git
cd rCore-Tutorial-v3
git checkout ch6
这一章主要有以下内容:
- 与文件访问相关的应用:使用了文件系统相关的系统调用,比如
sys_open - 实现文件系统 easy-fs
- 将文件系统嵌入到内核中
easy-fs 可以分成几层
- 磁盘块设备接口层:以块为单位进行磁盘IO读写,实现两个函数
read_block和write_block,对应 traitBlockDevice - 块缓冲层:从性能和一致性的角度考虑,需要加入内存缓冲进行统一管理,读取的块会加载到块缓冲层中,对应
BlockCache,创建的时候会自动读取磁盘块,后续的读写都会在缓冲上进行,被替换出的时候可能会写回磁盘(取决于脏位) - 磁盘数据结构层,包括五个部分
- Super Block
- Inode Bitmap
- Data Block Bitmap
- Inode
- Data Block
- 磁盘块管理层,对上面的数据结构进行管理,分配 inode、分配 data block 等
- 索引节点层,对单个文件进行创建、读写等
文件系统接口
文件与目录
使用 stat 命令可以获取一个文件的信息
sodium@nas-MacBook-Air-13 os % stat -x src/main.rs
  File: "src/main.rs"
  Size: 2214         FileType: Regular File
  Mode: (0644/-rw-r--r--)         Uid: (  501/  sodium)  Gid: (   20/   staff)
Device: 1,18   Inode: 29166762    Links: 1
Access: Sat Nov 14 10:50:49 2026
Modify: Sat Nov 14 10:50:49 2026
Change: Sat Nov 14 10:50:49 2026
 Birth: Sat Nov 14 10:50:49 2026
这里的 rwx 是权限位,分别对应了 read, write, execute,- 表示不具有权限,之所以有三块是因为分别对应了 该文件的所有者 / 在该文件所属的用户组内的其他用户 以及 剩下的所有用户 ,Uid 和 Gid 分别对应 User ID 和 Group ID。Links 在这里是硬链接次数。
sodium@nas-MacBook-Air-13 os % stat -x src
  File: "src"
  Size: 672          FileType: Directory
  Mode: (0755/drwxr-xr-x)         Uid: (  501/  sodium)  Gid: (   20/   staff)
Device: 1,18   Inode: 24743703    Links: 21
Access: Sat Nov 14 10:50:56 2026
Modify: Sat Nov 14 10:50:56 2026
Change: Sat Nov 14 10:50:56 2026
 Birth: Wed Oct 21 13:52:18 2026
这里的 Links: 21 是因为 APFS 的 st_nlink 为直接子项数量加 2 (自己加上 .)
sodium@nas-MacBook-Air-13 os % ls -la src
drwxr-xr-x     - sodium 14 Nov 10:50 boards
drwxr-xr-x     - sodium 14 Nov 10:50 drivers
drwxr-xr-x     - sodium 14 Nov 10:50 fs
drwxr-xr-x     - sodium 14 Nov 10:50 mm
drwxr-xr-x     - sodium  9 Nov 11:40 sync
drwxr-xr-x     - sodium 14 Nov 10:50 syscall
drwxr-xr-x     - sodium 14 Nov 10:50 task
drwxr-xr-x     - sodium 14 Nov 10:50 trap
.rw-r--r--   420 sodium 14 Nov 10:50 config.rs
.rw-r--r--   757 sodium  9 Nov 11:40 console.rs
.rw-r--r--   947 sodium 26 Oct 12:02 device_tree.rs
.rw-r--r--   241 sodium 26 Oct 12:02 entry.asm
.rw-r--r--   440 sodium  9 Nov 11:40 lang_items.rs
.rw-r--r--@ 4.0k sodium 14 Nov 10:50 link_app.S
.rw-r--r--   818 sodium 26 Oct 12:02 linker-qemu.ld
.rw-r--r--  1.3k sodium 26 Oct 12:02 logging.rs
.rw-r--r--  2.2k sodium 14 Nov 10:50 main.rs
.rw-r--r--   759 sodium  9 Nov 11:40 sbi.rs
.rw-r--r--   508 sodium  9 Nov 11:40 timer.rs
而对于 linux 的 ext4 来说则不是这样的,st_nlink 为这里显示的子目录数量加 2 (父目录目录项加上 . 目录项,加上每个子目录的 .. 指向这个目录)
sodium@ubuntu-lab:~/workspace/rCore-Tutorial-v3/os$ df -T .
Filesystem     Type 1K-blocks      Used Available Use% Mounted on
/dev/nvme1n1p2 ext4 982862268 613043504 319818432  66% /
sodium@ubuntu-lab:~/workspace/rCore-Tutorial-v3/os$ stat src
  File: src
  Size: 4096        Blocks: 8          IO Block: 4096   directory
Device: 259,4   Inode: 997         Links: 10
Access: (0775/drwxrwxr-x)  Uid: ( 1000/  sodium)   Gid: ( 1000/  sodium)
Access: 2026-11-14 11:57:54.215139939 +0800
Modify: 2026-11-14 11:58:43.947867146 +0800
Change: 2026-11-14 11:58:43.947867146 +0800
 Birth: 2026-11-14 11:57:54.215139939 +0800
easy-fs 功能
文件系统负责将逻辑上的目录树结构映射到持久存储设备上,也可以从持久设备上恢复逻辑上的目录树结构,具体的映射方式取决于文件系统的种类。为了进行统一的管理,VFS 规定了目录树的通用格式以及相关的抽象接口,不同的文件系统只要实现了这些内容,就能够通过挂载的方式用统一的逻辑目录树进行管理。
easy-fs 的功能简化了很多,甚至还不如之前的 OS HITSZ Lab5:文件系统,但是结构更加成熟,也具有块缓冲层。
我们的内核实现对于目录树结构进行了很大程度上的简化,这样做的目的是为了能够完整地展示文件系统的工作原理,但代码量又不至于太多。我们进行的简化如下:

- 扁平化:仅存在根目录 / 一个目录,剩下所有的文件都放在根目录内。在索引一个文件的时候,我们直接使用文件的文件名而不是它含有 / 的绝对路径。
- 权限控制:我们不设置用户和用户组概念,全程只有单用户。同时根目录和其他文件也都没有权限控制位,即完全不限制文件的访问方式,不会区分文件是否可执行。
- 不记录文件访问/修改的任何时间戳。
- 不支持软硬链接。

除了下面即将介绍的系统调用之外,其他的很多文件系统相关系统调用均未实现。
rCore 只实现了四个文件系统相关的系统调用
sys_open: 通过openfile()获得 inode,分配fd,然后添加到fd_table中,返回对应的下标fdsys_close: 检查输入,并且将fd_table中的元素通过take()变成 none,释放 fdsys_read: 对Filetrait 的read的封装。一共有标准输入/输出以及 inode 两类对象实现了Filetraitsys_write: 对Filetrait 的write的封装
rCore的文件标志位如下,如果打开时以 RDONLY ,那么就不能进行写操作,如果文件权限不允许读,那么就不能以 RDONLY 标志位打开。
// user/src/lib.rs

bitflags! {
    ///Open file flags
    pub struct OpenFlags: u32 {
        ///Read only
        const RDONLY = 0;
        ///Write only
        const WRONLY = 1 << 0;
        ///Read & Write
        const RDWR = 1 << 1;
        ///Allow create
        const CREATE = 1 << 9;
        ///Clear file and return an empty one
        const TRUNC = 1 << 10;
    }
}
pub fn open(path: &str, flags: OpenFlags) -> isize {
    sys_open(path, flags.bits)
}
easy-fs 设计与实现
easy-fs 是一个库形式 crate,实现一种简单的文件系统磁盘布局,而 easy-fs-fuse 则是能在开发环境(如 Ubuntu)中运行的应用程序,可用于测试和生成文件系统镜像。
easy-fs
├── Cargo.lock
├── Cargo.toml
├── src
│   ├── bitmap.rs
│   ├── block_cache.rs
│   ├── block_dev.rs
│   ├── efs.rs
│   ├── layout.rs
│   ├── lib.rs
│   └── vfs.rs
└── target
    ├── CACHEDIR.TAG
    ├── debug
    ├── flycheck0
    └── riscv64gc-unknown-none-elf
easy-fs-fuse
├── Cargo.lock
├── Cargo.toml
├── src
│   └── main.rs
└── target
    ├── CACHEDIR.TAG
    ├── debug
    ├── flycheck1
    ├── release
    └── riscv64gc-unknown-none-elf
1. 块设备接口层
// easy-fs/src/block_dev.rs

use core::any::Any;
/// Trait for block devices
/// which reads and writes data in the unit of blocks
pub trait BlockDevice: Send + Sync + Any {
    ///Read data form block to buffer
    fn read_block(&self, block_id: usize, buf: &mut [u8]);
    ///Write data from buffer to block
    fn write_block(&self, block_id: usize, buf: &[u8]);
}
这个 trait 提供了两个接口方法,需要具体的块设备驱动来实现,后续的读写都会基于这两个接口方法。
2. 块缓冲层
这一层需要向上层提供透明的块读取和写入,自动完成缓存的读取写入、持久化等操作。定义了三种结构体:
// easy-fs/src/lib.rs

pub const BLOCK_SZ: usize = 512;

// easy-fs/src/block_cache.rs

/// Use `ManuallyDrop` to ensure data is deallocated with an alignment of `BLOCK_SZ`
struct CacheData(ManuallyDrop<Box<[u8; BLOCK_SZ]>>);    // 禁止 Box 自动析构

/// Cached block inside memory
pub struct BlockCache {
    cache: CacheData,
    block_id: usize,
    block_device: Arc<dyn BlockDevice>, // 动态分发(Dynamic Dispatch),只要求类型实现 BlockDevice
    modified: bool,
}

pub struct BlockCacheManager {
    queue: VecDeque<(usize, Arc<Mutex<BlockCache>>)>,
}
CacheData 里面是一段需要手动 Drop 的字节数组指针;BlockCache 是某一个磁盘块的映射;BlockCacheManager 管理块缓存队列。
这一份代码在功能上类似于 xv6 的 bio.c,后者使用了数组来管理 buffer cache
注意到 rCore-Tutorial-Book 中给出的代码跟仓库代码存在差别,CacheData 直接被数组代替了,后续以仓库代码为准
pub struct BlockCache {
    cache: [u8; BLOCK_SZ],
    block_id: usize,
    block_device: Arc<dyn BlockDevice>,
    modified: bool,
}
CacheData
CacheData 实现了下面的方法和 trait ,包括创建/释放以及获得可变/不可变引用
impl CacheData {
    pub fn new() -> Self {
        let data = unsafe {
            let raw = alloc::alloc::alloc(Self::layout());  // 根据布局获得一片内存区域,类似于 malloc
            Box::from_raw(raw as *mut [u8; BLOCK_SZ])       // 接管裸指针,作为一段字节数组
        };
        Self(ManuallyDrop::new(data))                       // 用 ManuallyDrop 包裹 Box 指针,得到结构体的内容
    }

    fn layout() -> Layout {     // 获得 512 字节对齐的 512 字节大小的内存布局
        Layout::from_size_align(BLOCK_SZ, BLOCK_SZ).unwrap()
    }
}

impl Drop for CacheData {
    fn drop(&mut self) {        // 获取裸指针并释放
        let ptr = self.0.as_mut_ptr();
        unsafe { alloc::alloc::dealloc(ptr, Self::layout()) };
    }
}

impl AsRef<[u8]> for CacheData {
    fn as_ref(&self) -> &[u8] { // 获取裸指针返回字节数组切片
        let ptr = self.0.as_ptr() as *const u8;
        unsafe { slice::from_raw_parts(ptr, BLOCK_SZ) }
    }
}

impl AsMut<[u8]> for CacheData {
    fn as_mut(&mut self) -> &mut [u8] { // 获取裸指针返回可变切片
        let ptr = self.0.as_mut_ptr() as *mut u8;
        unsafe { slice::from_raw_parts_mut(ptr, BLOCK_SZ) }
    }
}
这里之所以要使用 ManuallyDrop 是因为通常情况下,Rust 在销毁 CacheData 时,会执行:
- 调用
CacheData自己的Drop::drop()。 - 自动析构结构体字段。
- 调用内部 Box 的析构逻辑,释放其拥有的内存。
由于内存布局比较特殊,因此 rCore 通过 dealloc() 来实现 Drop trait,而第一步调用了 dealloc 之后,如果没有 ManuallyDrop 的话 Box 就会发生二次释放
BlockCache
BlockCache 实现的方法和 trait 如下
impl BlockCache {
    pub fn new(block_id: usize, block_device: Arc<dyn BlockDevice>) -> Self {
        let mut cache = CacheData::new();
        block_device.read_block(block_id, cache.as_mut());  // 调用设备实现的接口
        Self {
            cache,
            block_id,
            block_device,
            modified: false,
        }
    }
    // 获取缓存的某个偏移的指针
    fn addr_of_offset(&self, offset: usize) -> *const u8 {
        addr_of!(self.cache.as_ref()[offset])
    }

    fn addr_of_offset_mut(&mut self, offset: usize) -> *mut u8 {
        addr_of_mut!(self.cache.as_mut()[offset])
    }
    // 从某个地址获得某个类型的(可变)引用
    pub fn get_ref<T>(&self, offset: usize) -> &T
    where
        T: Sized,
    {
        let type_size = core::mem::size_of::<T>();
        assert!(offset + type_size <= BLOCK_SZ);
        let addr = self.addr_of_offset(offset) as *const T;
        unsafe { &*addr }
    }

    pub fn get_mut<T>(&mut self, offset: usize) -> &mut T
    where
        T: Sized,
    {
        let type_size = core::mem::size_of::<T>();
        assert!(offset + type_size <= BLOCK_SZ);
        self.modified = true;
        let addr = self.addr_of_offset_mut(offset) as *mut T;
        unsafe { &mut *addr }
    }
    // 直接将缓存中的数据的引用传给闭包进行执行
    pub fn read<T, V>(&self, offset: usize, f: impl FnOnce(&T) -> V) -> V {
        f(self.get_ref(offset))
    }

    pub fn modify<T, V>(&mut self, offset: usize, f: impl FnOnce(&mut T) -> V) -> V {
        f(self.get_mut(offset))
    }
    // 持久化
    pub fn sync(&mut self) {
        if self.modified {
            self.modified = false;
            self.block_device
                .write_block(self.block_id, self.cache.as_ref());
        }
    }
}
// 丢弃时自动进行持久化操作
impl Drop for BlockCache {
    fn drop(&mut self) {
        self.sync()
    }
}
闭包(Closure)是一种能够捕获外部环境中变量的匿名函数,可以像普通函数一样被传递和调用。这里的 FnOnce 是一种闭包类型,之所以选择是因为其广泛性。
| 对比项 | FnOnce | FnMut | Fn |
|---|---|---|---|
| 调用方式 | self(取得所有权) | &mut self(可变借用) | &self(不可变借用) |
| 能否多次调用 | 不保证 | 可以 | 可以 |
| 读取捕获的变量 | ✅ | ✅ | ✅ |
| 修改捕获的变量 | ✅ | ✅ | 通常不行 |
| 消耗捕获变量的所有权 | ✅ | ❌ | ❌ |
| 是否要求闭包变量为 mut | 否 | 通常需要 | 否 |
| 典型用途 | 一次性任务、消耗资源 | 计数器、状态更新 | 计算、查询 |
| 约束强度 | 最宽松 | 中等 | 最严格 |
BlockCacheManager
BlockCacheManager 使用队列管理 BlockCache,实现了构造函数和获取 block cache 的方法
impl BlockCacheManager {
    pub fn new() -> Self {
        Self {
            queue: VecDeque::new(),
        }
    }

    pub fn get_block_cache(
        &mut self,
        block_id: usize,
        block_device: Arc<dyn BlockDevice>,
    ) -> Arc<Mutex<BlockCache>> {   // 提供可变引用互斥访问
        if let Some(pair) = self.queue.iter().find(|pair| pair.0 == block_id) { // 找到缓存就复制一份原子计数引用
            Arc::clone(&pair.1)
        } else {    // 没找到就考虑进行替换/插入新的缓存块
            // substitute
            if self.queue.len() == BLOCK_CACHE_SIZE {
                // from front to tail
                if let Some((idx, _)) = self
                    .queue
                    .iter()
                    .enumerate()
                    .find(|(_, pair)| Arc::strong_count(&pair.1) == 1)  // 说明没有别的引用,可以安全写回去
                {
                    self.queue.drain(idx..=idx);    // 删除索引为 idx 的元素
                } else {
                    panic!("Run out of BlockCache!");
                }
            }
            // load block into mem and push back
            let block_cache = Arc::new(Mutex::new(BlockCache::new(
                block_id,
                Arc::clone(&block_device),
            )));
            self.queue.push_back((block_id, Arc::clone(&block_cache)));
            block_cache
        }
    }
}
接口
块缓存管理器通过 lazy_static! 宏定义全局实例
lazy_static! {
    /// The global block cache manager
    pub static ref BLOCK_CACHE_MANAGER: Mutex<BlockCacheManager> =
        Mutex::new(BlockCacheManager::new());
}
/// Get the block cache corresponding to the given block id and block device
pub fn get_block_cache(
    block_id: usize,
    block_device: Arc<dyn BlockDevice>,
) -> Arc<Mutex<BlockCache>> {
    BLOCK_CACHE_MANAGER
        .lock()
        .get_block_cache(block_id, block_device)
}
/// Sync all block cache to block device
pub fn block_cache_sync_all() {
    let manager = BLOCK_CACHE_MANAGER.lock();
    for (_, cache) in manager.queue.iter() {
        cache.lock().sync();
    }
}
对外接口经过包装,只剩下 get_block_cache 和 block_cache_sync_all
3. 磁盘布局与磁盘上数据结构
磁盘布局分为五个部分,分别是超级块、inode和数据块位图以及inode和数据块
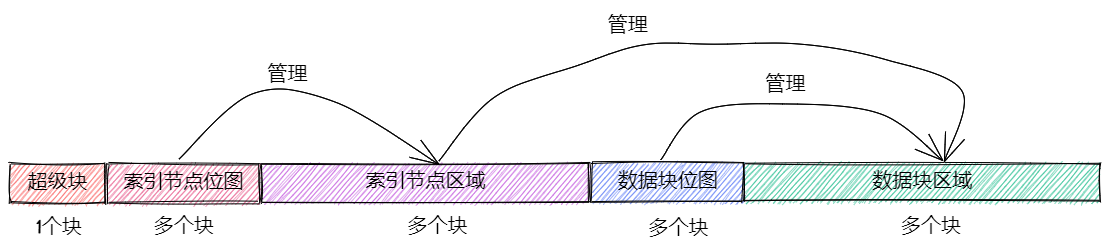
这里的 inode 应该包含元数据以及索引信息
Super Block
// easy-fs/src/layout.rs

#[repr(C)]
pub struct SuperBlock {
    magic: u32,
    pub total_blocks: u32,
    pub inode_bitmap_blocks: u32,
    pub inode_area_blocks: u32,
    pub data_bitmap_blocks: u32,
    pub data_area_blocks: u32,
}
Superblock 中包含了布局信息以及 magic,实现的方法如下
const EFS_MAGIC: u32 = 0x3b800001;

impl SuperBlock {
    /// Initialize a super block
    pub fn initialize(
        &mut self,
        total_blocks: u32,
        inode_bitmap_blocks: u32,
        inode_area_blocks: u32,
        data_bitmap_blocks: u32,
        data_area_blocks: u32,
    ) {
        *self = Self {
            magic: EFS_MAGIC,
            total_blocks,
            inode_bitmap_blocks,
            inode_area_blocks,
            data_bitmap_blocks,
            data_area_blocks,
        }
    }
    /// Check if a super block is valid using efs magic
    pub fn is_valid(&self) -> bool {
        self.magic == EFS_MAGIC
    }
}
Super block 放在了磁盘的第 0 个块
位图
inode 位图以及数据块位图使用了同一种数据结构
pub struct Bitmap {
    start_block_id: usize,
    blocks: usize,
}

type BitmapBlock = [u64; 64];   // 512 个字节
实现的方法包括构造函数、分配、释放以及获取最大值
// 根据 bit 序号返回 block 位置、u64 位置以及 bit 位置
fn decomposition(mut bit: usize) -> (usize, usize, usize) {
    let block_pos = bit / BLOCK_BITS;
    bit %= BLOCK_BITS;
    (block_pos, bit / 64, bit % 64)
}

impl Bitmap {
    /// A new bitmap from start block id and number of blocks
    pub fn new(start_block_id: usize, blocks: usize) -> Self {
        Self {
            start_block_id,
            blocks,
        }
    }
    /// Allocate a new block from a block device
    pub fn alloc(&self, block_device: &Arc<dyn BlockDevice>) -> Option<usize> {
        for block_id in 0..self.blocks {
            let pos = get_block_cache(  // 获取一个位图块
                block_id + self.start_block_id as usize,
                Arc::clone(block_device),
            )
            .lock()
            .modify(0, |bitmap_block: &mut BitmapBlock| {           // 检查是否有空闲
                if let Some((bits64_pos, inner_pos)) = bitmap_block
                    .iter()         // 得到遍历器,每次得到一个 &u64
                    .enumerate()    // 给每个元素附加索引比如 (0, &bitmap_block[0])
                    .find(|(_, bits64)| **bits64 != u64::MAX)   // 找到一个 u64 的位不是全为 1. find得到的是 &(&u64) 需两次解引用
                    .map(|(bits64_pos, bits64)| (bits64_pos, bits64.trailing_ones() as usize))  // trailing_ones() 计算从最低有效位(LSB)开始,连续有多少个 1
                {
                    // modify cache
                    bitmap_block[bits64_pos] |= 1u64 << inner_pos;  // 从右往左有 k 个 1 时,inner_pos刚好是 k
                    Some(block_id * BLOCK_BITS + bits64_pos * 64 + inner_pos as usize)  // 返回这个数据块的号码
                } else {
                    None
                }
            });
            if pos.is_some() {
                return pos;
            }
        }
        None
    }
    /// Deallocate a block
    pub fn dealloc(&self, block_device: &Arc<dyn BlockDevice>, bit: usize) {
        let (block_pos, bits64_pos, inner_pos) = decomposition(bit);    // 获取 bit 的位置
        get_block_cache(block_pos + self.start_block_id, Arc::clone(block_device))
            .lock()
            .modify(0, |bitmap_block: &mut BitmapBlock| {
                assert!(bitmap_block[bits64_pos] & (1u64 << inner_pos) > 0);    // 确保这个位是 1 再释放
                bitmap_block[bits64_pos] -= 1u64 << inner_pos;
            });
    }
    /// Get the max number of allocatable blocks
    pub fn maximum(&self) -> usize {
        self.blocks * BLOCK_BITS
    }
}
DiskInode
rCore 的 inode 使用了 28 个直接指针,一个一级间接索引和一个二级间接索引,支持最大文件大小为 512 * 28 + (512/4) * 512 + 128 * 128 * 512 也就是 14,336 Bytes + 14336 Bytes + 8,388,608 Bytes ,也就是大约 8 MB 大小的文件
// easy-fs/src/layout.rs

const INODE_DIRECT_COUNT: usize = 28;

/// A indirect block
type IndirectBlock = [u32; BLOCK_SZ / 4];   // 注意到每个元素大小是一个块指针大小

#[repr(C)]
pub struct DiskInode {
    pub size: u32,
    pub direct: [u32; INODE_DIRECT_COUNT],
    pub indirect1: u32,
    pub indirect2: u32,
    type_: DiskInodeType,
}

#[derive(PartialEq)]
pub enum DiskInodeType {
    File,
    Directory,
}
DiskInode 中实现了很多个方法,查看源码后列举如下
initialize(): 输入文件类型,将指针以及文件大小全部初始化为 0is_dir(): 根据文件类型判断是否是目录is_file(): 判断普通文件data_blocks(): 根据文件大小返回数据块数量,不包括间接块_data_blocks(): 私有方法,负责计算数据块数量给data_blocks()total_blocks(): 根据文件大小返回数据块数量,包括间接块blocks_num_needed(): 传入新的尺寸,返回需要的新的数据块数量(包括间接块)get_block_id(): 输入inner_id,视情况从间接块获取对应的指针increase_size(): 输入新的大小、新分配的数据块,然后修改 inode 和间接块,需要处理直接块、间接块共三种情况clear_size(): 将指针和大小清零,将所有需要释放的数据块的指针添加到数组中返回read_at(): 根据输入的offset计算数据块并且拷贝数据块的内容到buf中,超出文件大小不会读到任何数据。write_at(): 类似于read_at(),但是超出文件大小就不会继续写入
数据块与目录项
数据块本身只是字节数组
/// A data block
type DataBlock = [u8; BLOCK_SZ];
但是存放在数据块的目录的内容——目录项有自己的格式
const NAME_LENGTH_LIMIT: usize = 27;

/// A directory entry
#[repr(C)]
pub struct DirEntry {
    name: [u8; NAME_LENGTH_LIMIT + 1],
    inode_number: u32,
}
/// Size of a directory entry
pub const DIRENT_SZ: usize = 32;
注意到目录项的大小被设计成了能够对齐数据块大小,这里的 DirEntry 只保留了名字和 inode_number。DirEntry 实现的方法如下
impl DirEntry {
    /// Create an empty directory entry
    pub fn empty() -> Self {
        Self {
            name: [0u8; NAME_LENGTH_LIMIT + 1],
            inode_number: 0,
        }
    }
    /// Crate a directory entry from name and inode number
    pub fn new(name: &str, inode_number: u32) -> Self {
        let mut bytes = [0u8; NAME_LENGTH_LIMIT + 1];
        bytes[..name.len()].copy_from_slice(name.as_bytes());
        Self {
            name: bytes,
            inode_number,
        }
    }
    /// Serialize into bytes
    pub fn as_bytes(&self) -> &[u8] {
        unsafe { core::slice::from_raw_parts(self as *const _ as usize as *const u8, DIRENT_SZ) }
    }
    /// Serialize into mutable bytes
    pub fn as_bytes_mut(&mut self) -> &mut [u8] {
        unsafe { core::slice::from_raw_parts_mut(self as *mut _ as usize as *mut u8, DIRENT_SZ) }
    }
    /// Get name of the entry
    pub fn name(&self) -> &str {
        let len = (0usize..).find(|i| self.name[*i] == 0).unwrap();
        core::str::from_utf8(&self.name[..len]).unwrap()
    }
    /// Get inode number of the entry
    pub fn inode_number(&self) -> u32 {
        self.inode_number
    }
}
4. 磁盘块管理器
efs.c 中定义了结构体 EasyFileSystem 负责管理磁盘块(包括 inode 和数据块),这里的 block_device 会一层层传到设备驱动
pub struct EasyFileSystem {
    pub block_device: Arc<dyn BlockDevice>,
    pub inode_bitmap: Bitmap,
    pub data_bitmap: Bitmap,
    inode_area_start_block: u32,
    data_area_start_block: u32,
}
该数据结构实现了以下方法
create: 传入设备、磁盘块总数量(包括超级块、inode bitmap 的数据块等),inode bitmap 数据块数量。- 计算磁盘布局
- 所有数据块填上0
- 写入超级块
- 分配第一个
inode创建根节点并写入 - 进行持久化
- 返回对象
open: 传入设备,然后读取超级块,对当前对象进行初始化,返回Arc<Mutex<Self>>root_inode: 传入&Arc<Mutex<EasyFileSystem>>获取第 0 个 inode 的位置后,创建 root inode (类型是Inode而非DiskInode)返回get_disk_inode_pos: 传入 inode 的序号,返回全局 block 位置,包括 block 的序号以及 block 内的偏移量,注意 inode 不一定能够对齐填满数据块get_data_block_id: 输入数据块的序号,返回全局 block 位置alloc_inode: 通过 bitmap 分配 inode,返回 inode 序号alloc_data: 同样通过 bitmap 分配 data block,返回的是全局 block 位置dealloc_data: 先讲数据块清零,然后再调用 bitmap 的dealloc,注意传给dealloc的是 data block 的序号,而非全局 block 位置
5. 索引节点
这里的 Inode 和前面的 DiskInode 不同,DiskInode 是持久化到磁盘的部分,而 Inode 中的数据则不会持久化。
// easy-fs/src/vfs.rs
pub struct Inode {
    block_id: usize,
    block_offset: usize,
    fs: Arc<Mutex<EasyFileSystem>>,
    block_device: Arc<dyn BlockDevice>,
}
#[repr(C)]
pub struct DiskInode {
    pub size: u32,
    pub direct: [u32; INODE_DIRECT_COUNT],
    pub indirect1: u32,
    pub indirect2: u32,
    type_: DiskInodeType,
}
这里 block_id 和 block_offset 用于定位 inode 在磁盘中的位置,fs 是因为操作需要通过文件系统完成
Inode 下实现了 12 个方法,查看源码后列举如下
new: 普通的构造函数read_disk_inode: 私有方法,调用了block_cache::BlockCache的read,传入的闭包直接交给read进行操作,闭包参数通常是&DiskInodemodify_disk_inode: 私有方法,类似read_disk_inodefind_inode_id: 私有方法,传入一个目录 inode,然后根据name寻找 dirent,如果匹配名字,那么返回Some(dirent.inode_number() as u32),未找到返回Nonefind: 获取fs锁,通过read_disk_inode获取disk_inode数据,调用find_inode_id进行查找,找到之后,创建一个新的Inode对象 ,返回 Arc 引用,可能会出现多个Inode对象指向同一个DiskInode的情况,不过因为fs有锁,所以不用担心并发问题。increase_size: 私有方法,需要传入disk_inode进行操作,先通过blocks_num_needed获取需要的新的数据块数量,然后分配数据块并插入到数组中,该数组传给 disk inode 的increase_size方法进行扩大尺寸。这个方法被write和create引用create: 获取 fs 锁,检查要创建的 inode 是否存在,是就返回None,否则分配 inode id 并初始化新的 inode (.initialize(DiskInodeType::File)),然后修改 root inode,扩大尺寸并写入新的条目,最后进行持久化,并创建新的 Inode 对象返回 Arc 引用ls: 获取 fs 锁,根据file_count读 dirent 然后返回 String 指针read_at: 传入偏移量和buf,获取 fs 锁之后调用read_disk_inode读取数据到bufwrite_at: 和read_at类似,也需要 fs 锁clear: 获取 fs 锁,调用clear_size获取要清除的数据块数组,检查数量无误后调用dealloc_data清除掉数据块,然后同步到磁盘
其中 create 如下,其他代码省略,这个函数应该是只有根节点才能调用的
impl Inode {
    /// Create inode under current inode by name
    pub fn create(&self, name: &str) -> Option<Arc<Inode>> {
        let mut fs = self.fs.lock();
        let op = |root_inode: &DiskInode| {
            // assert it is a directory
            assert!(root_inode.is_dir());
            // has the file been created?
            self.find_inode_id(name, root_inode)
        };
        if self.read_disk_inode(op).is_some() {
            return None;
        }
        // create a new file
        // alloc a inode with an indirect block
        let new_inode_id = fs.alloc_inode();
        // initialize inode
        let (new_inode_block_id, new_inode_block_offset) = fs.get_disk_inode_pos(new_inode_id);
        get_block_cache(new_inode_block_id as usize, Arc::clone(&self.block_device))
            .lock()
            .modify(new_inode_block_offset, |new_inode: &mut DiskInode| {
                new_inode.initialize(DiskInodeType::File);
            });
        self.modify_disk_inode(|root_inode| {
            // append file in the dirent
            let file_count = (root_inode.size as usize) / DIRENT_SZ;
            let new_size = (file_count + 1) * DIRENT_SZ;
            // increase size
            self.increase_size(new_size as u32, root_inode, &mut fs);
            // write dirent
            let dirent = DirEntry::new(name, new_inode_id);
            root_inode.write_at(
                file_count * DIRENT_SZ,
                dirent.as_bytes(),
                &self.block_device,
            );
        });

        let (block_id, block_offset) = fs.get_disk_inode_pos(new_inode_id);
        block_cache_sync_all();
        // return inode
        Some(Arc::new(Self::new(
            block_id,
            block_offset,
            self.fs.clone(),
            self.block_device.clone(),
        )))
        // release efs lock automatically by compiler
    }
}
这里的 if self.read_disk_inode(op).is_some() 的调用链条如下,首先定义闭包
let op = |root_inode: &DiskInode| {
    // assert it is a directory
    assert!(root_inode.is_dir());
    // has the file been created?
    self.find_inode_id(name, root_inode)
};
这里参数之所以 root_inode 是因为正常来说只有 root_inode 才能调用这个方法,easy-fs 中只有 root inode 一个目录,其他常规文件都在这个目录下
这个闭包被传给了 self.read_disk_inode(op),可以看到,这个函数调用了 get_block_cache 获取了 Block Cache 然后通过 read 执行这个闭包
/// Call a function over a disk inode to read it
fn read_disk_inode<V>(&self, f: impl FnOnce(&DiskInode) -> V) -> V {
    get_block_cache(self.block_id, Arc::clone(&self.block_device))
        .lock()
        .read(self.block_offset, f)
}
BlockCache 的 read 方法如下,可以看到,闭包在这里进行了调用,传入的是上面传递下来的 offset,这样就得到了 root_inode 的数据,然后执行闭包中的内容
pub fn read<T, V>(&self, offset: usize, f: impl FnOnce(&T) -> V) -> V {
    f(self.get_ref(offset))
}
/// Find inode under a disk inode by name
fn find_inode_id(&self, name: &str, disk_inode: &DiskInode) -> Option<u32> {
    // assert it is a directory
    assert!(disk_inode.is_dir());
    let file_count = (disk_inode.size as usize) / DIRENT_SZ;
    let mut dirent = DirEntry::empty();
    for i in 0..file_count {
        assert_eq!(
            disk_inode.read_at(DIRENT_SZ * i, dirent.as_bytes_mut(), &self.block_device,),
            DIRENT_SZ,
            );
        if dirent.name() == name {
            return Some(dirent.inode_number() as u32);
        }
    }
    None
}
用户态测试 easy-fs
easy-fs 的测试放在另一个名为 easy-fs-fuse 的应用程序中,不同于 easy-fs ,它是一个可以调用标准库 std 的应用程序 ,能够在Rust应用开发环境上运行并很容易调试。
但是 easy-fs 在内核中只能使用 no_std 模式,与用户态不同
要测试 easy-fs ,就要提供磁盘的接口,所以 easy-fs-fuse 使用普通文件模拟了一个块设备
// easy-fs-fuse/src/main.rs

use std::fs::File;
use easy-fs::BlockDevice;

const BLOCK_SZ: usize = 512;

struct BlockFile(Mutex<File>);

impl BlockDevice for BlockFile {
    fn read_block(&self, block_id: usize, buf: &mut [u8]) {
        let mut file = self.0.lock().unwrap();
        file.seek(SeekFrom::Start((block_id * BLOCK_SZ) as u64))
            .expect("Error when seeking!"); // Err(e) => panic!("Error when seeking!: {:?}", e),
        assert_eq!(file.read(buf).unwrap(), BLOCK_SZ, "Not a complete block!");
    }

    fn write_block(&self, block_id: usize, buf: &[u8]) {
        let mut file = self.0.lock().unwrap();
        file.seek(SeekFrom::Start((block_id * BLOCK_SZ) as u64))
            .expect("Error when seeking!");
        assert_eq!(file.write(buf).unwrap(), BLOCK_SZ, "Not a complete block!");
    }
}
需要注意的是,文件的读写需要先调用 seek 设置偏移量
efs_test 展示了 easy-fs 库的使用方法
#[test]
fn efs_test() -> std::io::Result<()> {
    // 创建 BlockFile 计数引用
    let block_file = Arc::new(BlockFile(Mutex::new({
        let f = OpenOptions::new()
            .read(true)
            .write(true)
            .create(true)
            .open("target/fs.img")?;
        f.set_len(8192 * 512).unwrap();
        f
    })));
    // 将 block_file 当作磁盘设备,创建 efs(这一步会覆盖原本的文件内容),总共 4096个 block ,设置一个 inode bitmap block
    EasyFileSystem::create(block_file.clone(), 4096, 1);
    let efs = EasyFileSystem::open(block_file.clone()); // 打开 efs
    let root_inode = EasyFileSystem::root_inode(&efs);  // 获得 root_inode
    root_inode.create("filea"); // 在 root_inode 下创建 filea 和 fileb
    root_inode.create("fileb");
    for name in root_inode.ls() {   // 调用 ls 函数获得目录下所有文件名
        println!("{}", name);
    }
    let filea = root_inode.find("filea").unwrap();  // 找到 filea 的 inode
    let greet_str = "Hello, world!";
    filea.write_at(0, greet_str.as_bytes());        // 写入数据
    //let mut buffer = [0u8; 512];
    let mut buffer = [0u8; 233];
    let len = filea.read_at(0, &mut buffer);        // 读取刚写入的数据
    assert_eq!(greet_str, core::str::from_utf8(&buffer[..len]).unwrap(),);
    // 定义闭包,随机生成一段长度为 len 的字符串进行写入测试
    let mut random_str_test = |len: usize| {
        filea.clear();
        assert_eq!(filea.read_at(0, &mut buffer), 0,);
        let mut str = String::new();
        use rand;
        // random digit
        for _ in 0..len {
            str.push(char::from('0' as u8 + rand::random::<u8>() % 10));
        }
        filea.write_at(0, str.as_bytes());
        let mut read_buffer = [0u8; 127];
        let mut offset = 0usize;
        let mut read_str = String::new();
        loop {
            let len = filea.read_at(offset, &mut read_buffer);
            if len == 0 {
                break;
            }
            offset += len;
            read_str.push_str(core::str::from_utf8(&read_buffer[..len]).unwrap());
        }
        assert_eq!(str, read_str);
    };

    random_str_test(4 * BLOCK_SZ);
    random_str_test(8 * BLOCK_SZ + BLOCK_SZ / 2);
    random_str_test(100 * BLOCK_SZ);
    random_str_test(70 * BLOCK_SZ + BLOCK_SZ / 7);
    random_str_test((12 + 128) * BLOCK_SZ);
    random_str_test(400 * BLOCK_SZ);
    random_str_test(1000 * BLOCK_SZ);
    random_str_test(2000 * BLOCK_SZ);

    Ok(())
}
将应用打包为 easy-fs 镜像
通过使用文件系统,就可以不必将应用全部放到内存中了,后续只需要从文件系统中读取出 ELF 数据即可,ELF 数据需要被打包到 easy-fs 镜像中
fn easy_fs_pack() -> std::io::Result<()> {
    // 创建解析命令行参数
    let matches = App::new("EasyFileSystem packer")
        .arg(                           // 将参数添加到解析器中
            Arg::with_name("source")    // 指定参数名 source
                .short("s")             // 允许缩写 -s 和长名 --source 指定参数
                .long("source")
                .takes_value(true)      // 接收值
                .help("Executable source dir(with backslash)"), // 设置帮助信息
        )
        .arg(
            Arg::with_name("target")
                .short("t")
                .long("target")
                .takes_value(true)
                .help("Executable target dir(with backslash)"),
        )
        .get_matches();
    // 示例:
    // easy-fs-fuse \
    //   -s ../user/src/bin/ \
    //   -t ../user/target/riscv64gc-unknown-none-elf/release/
    // 获取解析器中的数值
    // source = ../user/src/bin/
    // target = ../user/target/riscv64gc-unknown-none-elf/release/
    let src_path = matches.value_of("source").unwrap();
    let target_path = matches.value_of("target").unwrap();
    // os 目录下运行 make run 时
    // src_path = ../user/src/bin/
    // target_path = ../user/target/riscv64gc-unknown-none-elf/release/
    println!("src_path = {}\ntarget_path = {}", src_path, target_path);
    // 和前面类似,这里创建了一个 16 * 2048 个块大小的文件(16 MiB)
    let block_file = Arc::new(BlockFile(Mutex::new({
        let f = OpenOptions::new()
            .read(true)
            .write(true)
            .create(true)
            .open(format!("{}{}", target_path, "fs.img"))?;
        f.set_len(16 * 2048 * 512).unwrap();
        f
    })));
    // 一个 inode bitmap block,也就是 4096 个 inode 最多
    let efs = EasyFileSystem::create(block_file, 16 * 2048, 1);
    let root_inode = Arc::new(EasyFileSystem::root_inode(&efs));
    // 去除扩展名
    let apps: Vec<_> = read_dir(src_path)
        .unwrap()
        .into_iter()    // 获取迭代器
        .map(|dir_entry| {  // 对每个元素执行闭包
            let mut name_with_ext = dir_entry.unwrap().file_name().into_string().unwrap();  // 获取文件名 OsString 并转换成字符串 String
            name_with_ext.drain(name_with_ext.find('.').unwrap()..name_with_ext.len());     // 找到第一个 '.'` 然后通过 drain 删除后面的字符串
            name_with_ext   // 返回字符串
        })
        .collect();     // 将产生的元素收集为集合
    // 创建新文件到 root_inode 目录下并写入数据
    for app in apps {
        // load app data from host file system
        let mut host_file = File::open(format!("{}{}", target_path, app)).unwrap();
        let mut all_data: Vec<u8> = Vec::new();
        host_file.read_to_end(&mut all_data).unwrap();
        // create a file in easy-fs
        let inode = root_inode.create(app.as_str()).unwrap();
        // write data to easy-fs
        inode.write_at(0, all_data.as_slice());
    }

    Ok(())
}
可以运行下面的命令来生成 fs.img 到 target path
# os 目录下
$ ../easy-fs-fuse/target/release/easy-fs-fuse -s ../user/src/bin/ -t ../user/target/riscv64gc-unknown-none-elf/release/
可以在 os 目录下的 Makefile 中看到相应的命令
fs-img: $(APPS)
    @cd ../user && make build TEST=$(TEST)
    @rm -f $(FS_IMG)
    @cd ../easy-fs-fuse && cargo run --release -- -s ../user/src/bin/ -t ../user/target/riscv64gc-unknown-none-elf/release/
easy-fs 接入内核
easy-fs 接入内核可以分成下面几层
- 块设备驱动层:根据 qemu 或者平台不同,实现
BlockDevicetrait - easy-fs 层
- OSInode层:表示进程中一个打开的常规文件
- 文件描述符层:实现
Filetrait,这样才能通过sys_read/sys_write读写 - 系统调用层
文件
File trait 代码如下
///Array of u8 slice that user communicate with os
pub struct UserBuffer {
    ///U8 vec
    pub buffers: Vec<&'static mut [u8]>,
}

/// File trait
pub trait File: Send + Sync {
    /// If readable
    fn readable(&self) -> bool;
    /// If writable
    fn writable(&self) -> bool;
    /// Read file to `UserBuffer`
    fn read(&self, buf: UserBuffer) -> usize;
    /// Write `UserBuffer` to file
    fn write(&self, buf: UserBuffer) -> usize;
}
这里的 UserBuffer 只是将字节切片封装了起来
impl UserBuffer {
    ///Create a `UserBuffer` by parameter
    pub fn new(buffers: Vec<&'static mut [u8]>) -> Self {
        Self { buffers }
    }
    ///Length of `UserBuffer`
    pub fn len(&self) -> usize {
        let mut total: usize = 0;
        for b in self.buffers.iter() {
            total += b.len();
        }
        total
    }
}
UserBuffer 的迭代器能够逐字节写,而使用 Vec<T> 的迭代器可以逐切片访问
/// Iterator of `UserBuffer`
pub struct UserBufferIterator {
    buffers: Vec<&'static mut [u8]>,
    current_buffer: usize,
    current_idx: usize,
}
块设备驱动
rCore 仓库和 Tutorial-Book 代码在这里出现了不同,文档中给出了多硬件架构的代码
/* rCore-Tutorial-Book-v3 3.6.0-alpha.1 文档 */
// os/drivers/block/mod.rs

#[cfg(feature = "board_qemu")]
type BlockDeviceImpl = virtio_blk::VirtIOBlock;

#[cfg(feature = "board_k210")]
type BlockDeviceImpl = sdcard::SDCardWrapper;

lazy_static! {
    pub static ref BLOCK_DEVICE: Arc<dyn BlockDevice> = Arc::new(BlockDeviceImpl::new());
}
可以看到这里通过 #[cfg(feature = "...")] 的方式选择 BlockDeviceImpl
Cargo.toml 中可以设置 features ,编译的时候进行指定 --features ... ,类似于第一章中的日志
[features]
log-error = []
log-warn = []
log-info = []
log-debug = []
log-trace = []
而在仓库代码中只有 qemu ,并且 type 也不是放在 mod.rs 中,而是在 board/qemu.rs 中定义
// block/mod.rs
use crate::board::BlockDeviceImpl;
use alloc::sync::Arc;
use easy_fs::BlockDevice;
use lazy_static::*;

lazy_static! {
    pub static ref BLOCK_DEVICE: Arc<dyn BlockDevice> = Arc::new(BlockDeviceImpl::new());
}
QEMU
由于仓库中没找到 K210 的代码,并且书中也写了驱动比较复杂,所以这里只查看了 QEMU 的驱动
#[cfg(feature = "board_qemu")]
type BlockDeviceImpl = virtio_blk::VirtIOBlock;
可以看到 QEMU 使用的结构体是 VirtIOBlock
use virtio_drivers::{Hal, VirtIOBlk, VirtIOHeader};
pub struct VirtIOBlock(UPSafeCell<VirtIOBlk<'static, VirtioHal>>);
在 QEMU 中,可以配置参数来添加 VirtIO 设备(-drive..., -device..)这里新增的参数和 xv6 一样
# os/Makefile

FS_IMG := ../user/target/$(TARGET)/$(MODE)/fs.img

run-inner: build
ifeq ($(BOARD),qemu)
    @qemu-system-riscv64 \
        -machine virt \
        -nographic \
        -bios $(BOOTLOADER) \
        -device loader,file=$(KERNEL_BIN),addr=$(KERNEL_ENTRY_PA) \
        -drive file=$(FS_IMG),if=none,format=raw,id=x0 \
        -device virtio-blk-device,drive=x0,bus=virtio-mmio-bus.0
倒数第二行这里 $(FS_IMG) 即为 fs.img 的路径
file=$(FS_IMG): 指定磁盘镜像文件的路径,即 fs.imgif=none: 不让-drive自动创建 IDE、SCSI 等设备接口format=raw: 指定磁盘镜像采用 RAW 格式id=x0: 给磁盘后端命名为x0,供后续设备引用
倒数第一行指定了设备
virtio-blk-device: 创建 VirtIO 块设备drive=x0: 将设备连接到前面定义的磁盘后端 x0bus=virtio-mmio-bus.0: 将设备挂到第 0 个 VirtIO MMIO 总线上
MMIO 全称为 Memory-Mapped I/O,这样 CPU 就可以通过特定内存地址访问外设,这些内存地址不会与物理内存产生交集
在 xv6 中定义了 VirtIO MMIO 的地址,除此之外还有一堆控制和地址相关的宏定义
// virtio mmio interface
#define VIRTIO0 0x10001000
#define VIRTIO0_IRQ 1
这也是 rCore 需要使用的地址,长度为 4 KiB ,这段区域需要建立内核页表映射
// os/src/config.rs

#[cfg(feature = "board_qemu")]
pub const MMIO: &[(usize, usize)] = &[
    (0x10001000, 0x1000),
];
这里直接将所有的 MMIO 都放进了数组中,然后统一建立映射
// os/src/mm/memory_set.rs

use crate::config::MMIO;

impl MemorySet {
    /// Without kernel stacks.
    pub fn new_kernel() -> Self {
        ...
        println!("mapping memory-mapped registers");
        for pair in MMIO {
            memory_set.push(MapArea::new(
                (*pair).0.into(),               // 起始地址
                ((*pair).0 + (*pair).1).into(), // 结束地址
                MapType::Identical,
                MapPermission::R | MapPermission::W,
            ), None);
        }
        memory_set
    }
}
rCore 直接使用了 virtio-drivers crate 来省去繁琐的驱动开发,通过 UPSafeCell 包装现成的 VirtIOBlk
// virtio-drivers/src/blk.rs 库中的定义
pub struct VirtIOBlk<'a, H: Hal> {      // H 是由使用者提供的平台适配层
    header: &'static mut VirtIOHeader,  // 一组设备寄存器
    queue: VirtQueue<'a, H>,            // 用于提交请求和接收响应
    capacity: usize,
}

// os/src/drivers/block/virtio_blk.rs
use virtio_drivers::{Hal, VirtIOBlk, VirtIOHeader};
const VIRTIO0: usize = 0x10001000;

pub struct VirtIOBlock(UPSafeCell<VirtIOBlk<'static, VirtioHal>>);

impl VirtIOBlock {
    pub fn new() -> Self {
        unsafe {
            Self(UPSafeCell::new(
                VirtIOBlk::<VirtioHal>::new(&mut *(VIRTIO0 as *mut VirtIOHeader)).unwrap(),
            ))
        }
    }
}

impl BlockDevice for VirtIOBlock {
    fn read_block(&self, block_id: usize, buf: &mut [u8]) {
        self.0
            .exclusive_access()
            .read_block(block_id, buf)
            .expect("Error when reading VirtIOBlk");
    }
    fn write_block(&self, block_id: usize, buf: &[u8]) {
        self.0
            .exclusive_access()
            .write_block(block_id, buf)
            .expect("Error when writing VirtIOBlk");
    }
}
VirtioHal 需要实现 Hal 的 Trait 类型,因为驱动库并不负责管理内存,但是又需要获取内存
pub struct VirtioHal;

impl Hal for VirtioHal {
    fn dma_alloc(pages: usize) -> usize {       // 分配物理页帧
        let mut ppn_base = PhysPageNum(0);
        for i in 0..pages {
            let frame = frame_alloc().unwrap();
            if i == 0 {
                ppn_base = frame.ppn;
            }
            assert_eq!(frame.ppn.0, ppn_base.0 + i);    // 需要确保分配出来的物理帧页是连续的
            QUEUE_FRAMES.exclusive_access().push(frame);    // QUEUE_FRAMES 确保帧不被提前释放
        }
        let pa: PhysAddr = ppn_base.into();
        pa.0
    }

    fn dma_dealloc(pa: usize, pages: usize) -> i32 {    // 释放物理页帧,但是 usertests 过程没有出现调用情况
        let pa = PhysAddr::from(pa);
        let mut ppn_base: PhysPageNum = pa.into();  // 更合理的做法应该是从 QUEUE_FRAMES 中找到相应 FrameTracker 并 remove,会自动释放
        for _ in 0..pages {
            frame_dealloc(ppn_base);
            ppn_base.step();
        }
        0
    }

    fn phys_to_virt(addr: usize) -> usize { // 转换物理地址成虚拟地址
        addr
    }

    fn virt_to_phys(vaddr: usize) -> usize {    // 转换虚拟地址成物理地址
        PageTable::from_token(kernel_token())
            .translate_va(VirtAddr::from(vaddr))
            .unwrap()
            .0
    }
}
实际运行时发现 dma_alloc 在内核初始化期间会被调用一次,分配两个物理页帧
内核 Inode 层
内核的 Inode 定义如下
/// A wrapper around a filesystem inode
/// to implement File trait atop
pub struct OSInode {
    // 描述 sys_read/sys_write 能否操作
    readable: bool,
    writable: bool,
    inner: UPSafeCell<OSInodeInner>,        // 教程书使用 Mutex<OSInodeInner>
}
/// The OS inode inner in 'UPSafeCell'
pub struct OSInodeInner {
    //
    offset: usize,
    inode: Arc<InodeType>,
}
OSInode 实现了以下方法
new: 输入 readable, writeable, 以及 inode 的计数引用read_all: 将 inode 的所有数据推入到Vec<u8>中- 实现了
Filetrait
xv6 中的 inode 只有一种,记录了全部信息
// in-memory copy of an inode
struct inode {
  uint dev;           // Device number
  uint inum;          // Inode number
  int ref;            // Reference count
  struct sleeplock lock; // protects everything below here
  int valid;          // inode has been read from disk?

  short type;         // copy of disk inode
  short major;
  short minor;
  short nlink;
  uint size;
  uint addrs[NDIRECT+1];
};
文件描述符层
OSInode 需要实现 File trait,然后就可以当作文件来对待了
impl File for OSInode {
    fn readable(&self) -> bool {
        self.readable
    }
    fn writable(&self) -> bool {
        self.writable
    }
    fn read(&self, mut buf: UserBuffer) -> usize {
        let mut inner = self.inner.exclusive_access();  // Mutex 改为 .lock()
        let mut total_read_size = 0usize;
        for slice in buf.buffers.iter_mut() {
            let read_size = inner.inode.read_at(inner.offset, *slice);
            if read_size == 0 {
                break;
            }
            inner.offset += read_size;
            total_read_size += read_size;
        }
        total_read_size
    }
    fn write(&self, buf: UserBuffer) -> usize {
        let mut inner = self.inner.exclusive_access();
        let mut total_write_size = 0usize;
        for slice in buf.buffers.iter() {
            let write_size = inner.inode.write_at(inner.offset, *slice);
            assert_eq!(write_size, slice.len());
            inner.offset += write_size;
            total_write_size += write_size;
        }
        total_write_size
    }
}
对于不同类型的文件,需要的字段可能不同,而 xv6 的结构体将所有可能用到的字段都写了进去,同时标注文件类型来判断具体使用哪个字段
struct file {
  enum { FD_NONE, FD_PIPE, FD_INODE, FD_DEVICE } type;
  int ref; // reference count
  char readable;
  char writable;
  struct pipe *pipe; // FD_PIPE
  struct inode *ip;  // FD_INODE and FD_DEVICE
  uint off;          // FD_INODE
  short major;       // FD_DEVICE
};
// Read from file f.
// addr is a user virtual address.
int
fileread(struct file *f, uint64 addr, int n)
{
  int r = 0;

  if(f->readable == 0)
    return -1;

  if(f->type == FD_PIPE){
    r = piperead(f->pipe, addr, n);
  } else if(f->type == FD_DEVICE){
    if(f->major < 0 || f->major >= NDEV || !devsw[f->major].read)
      return -1;
    r = devsw[f->major].read(1, addr, n);
  } else if(f->type == FD_INODE){
    ilock(f->ip);
    if((r = readi(f->ip, 1, addr, f->off, n)) > 0)
      f->off += r;
    iunlock(f->ip);
  } else {
    panic("fileread");
  }

  return r;
}
这里的 readi 直接经过缓冲层 buffer cache 从虚拟 io 中进行读取,没有 DiskInode, Inode, OSInode 的分层
文件描述符表
每个进程都有打开的文件,这些文件通过文件描述符和文件描述符表来管理
pub struct TaskControlBlockInner {
    pub trap_cx_ppn: PhysPageNum,
    #[allow(unused)]
    pub base_size: usize,
    pub task_cx: TaskContext,
    pub task_status: TaskStatus,
    pub memory_set: MemorySet,
    pub parent: Option<Weak<TaskControlBlock>>,
    pub children: Vec<Arc<TaskControlBlock>>,
    pub exit_code: i32,
    pub fd_table: Vec<Option<Arc<dyn File + Send + Sync>>>,     // <=== dyn 要求实现 File, Send, Sync 三个 trait
}
在 xv6 中,fd_table 就是一个数组,文件描述符就是数组下标
struct proc {
  struct spinlock lock;

  // p->lock must be held when using these:
  enum procstate state;        // Process state
  struct proc *parent;         // Parent process
  void *chan;                  // If non-zero, sleeping on chan
  int killed;                  // If non-zero, have been killed
  int xstate;                  // Exit status to be returned to parent's wait
  int pid;                     // Process ID

  // these are private to the process, so p->lock need not be held.
  uint64 kstack;               // Virtual address of kernel stack
  uint64 sz;                   // Size of process memory (bytes)
  pagetable_t pagetable;       // User page table
  struct trapframe *trapframe; // data page for trampoline.S
  struct context context;      // swtch() here to run process
  struct file *ofile[NOFILE];  // Open files
  struct inode *cwd;           // Current directory
  char name[16];               // Process name (debugging)
};
应用访问文件与四个系统调用
初始化
文件系统需要初始化,需要打开块设备和文件系统,然后获取 root inode
// os/src/drivers/block/virtio_blk.rs
impl VirtIOBlock {
    #[allow(unused)]
    pub fn new() -> Self {
        unsafe {
            Self(UPSafeCell::new(
                VirtIOBlk::<VirtioHal>::new(&mut *(VIRTIO0 as *mut VirtIOHeader)).unwrap(),
            ))
        }
    }
}
// os/src/drivers/block/mod.rs
lazy_static! {
    pub static ref BLOCK_DEVICE: Arc<dyn BlockDevice> = Arc::new(BlockDeviceImpl::new());
}
// os/src/fs/inode.rs
lazy_static! {
    pub static ref ROOT_INODE: Arc<Inode> = {
        let efs = EasyFileSystem::open(BLOCK_DEVICE.clone());
        Arc::new(EasyFileSystem::root_inode(&efs))
    };
}
list_apps() 也可以更简洁地实现
// os/src/fs/inode.rs

/// List all files in the filesystems
pub fn list_apps() {
    println!("/**** APPS ****");
    for app in ROOT_INODE.ls() {
        println!("{}", app);
    }
    println!("**************/");
}
打开与关闭文件
打开文件,正常来说需要维护的引用计数通过 Arc 自动处理了,返回 OSInode 的引用即可
// os/src/fs/inode.rs

pub fn open_file(name: &str, flags: OpenFlags) -> Option<Arc<OSInode>> {
    let (readable, writable) = flags.read_write();
    if flags.contains(OpenFlags::CREATE) {
        if let Some(inode) = ROOT_INODE.find(name) {    // 新建文件会覆盖掉原本的文件
            // clear size
            inode.clear();
            Some(Arc::new(OSInode::new(readable, writable, inode)))
        } else {
            // create file
            ROOT_INODE
                .create(name)
                .map(|inode| Arc::new(OSInode::new(readable, writable, inode)))
        }
    } else {
        ROOT_INODE.find(name).map(|inode| {
            if flags.contains(OpenFlags::TRUNC) {
                inode.clear();          // 打开已有文件带 TRUNC 标签会清空原本的文件
            }
            Arc::new(OSInode::new(readable, writable, inode))
        })
    }
}
// os/src/syscall/fs.rs
pub fn sys_open(path: *const u8, flags: u32) -> isize {
    let task = current_task().unwrap();
    let token = current_user_token();
    let path = translated_str(token, path);
    if let Some(inode) = open_file(path.as_str(), OpenFlags::from_bits(flags).unwrap()) {
        let mut inner = task.inner_exclusive_access();
        let fd = inner.alloc_fd();  // 分配一个 fd 并填入 OSInode 引用
        inner.fd_table[fd] = Some(inode);
        fd as isize
    } else {
        -1
    }
}

pub fn sys_close(fd: usize) -> isize {
    let task = current_task().unwrap();
    let mut inner = task.inner_exclusive_access();
    if fd >= inner.fd_table.len() {
        return -1;
    }
    if inner.fd_table[fd].is_none() {
        return -1;
    }
    inner.fd_table[fd].take();  // 取走这个引用,该应用会自动释放
    0
}
通过文件加载应用
只需要修改 exec 中 ELF 数据来源即可
pub fn sys_exec(path: *const u8) -> isize {
    let token = current_user_token();
    let path = translated_str(token, path);
    if let Some(app_inode) = open_file(path.as_str(), OpenFlags::RDONLY) {
        let all_data = app_inode.read_all();
        let task = current_task().unwrap();
        task.exec(all_data.as_slice());
        0
    } else {
        -1
    }
}
这里的 read_all 已经在前面介绍过了,也就是读取全部数据塞入到 Vec<u8> 返回,内部实现是创建一个 Block 大小的缓冲区然后通过 read_at 循环读取
initproc 也可以通过文件系统来读取了
lazy_static! {
    ///Globle process that init user shell
    pub static ref INITPROC: Arc<TaskControlBlock> = Arc::new({
        let inode = open_file("initproc", OpenFlags::RDONLY).unwrap();
        let v = inode.read_all();
        TaskControlBlock::new(v.as_slice())
    });
}
读写文件
由于 OSInode 已经实现了 File trait ,从 fd table 中获取了 file 之后正常读写即可
// os/src/syscall/fs.rs

pub fn sys_write(fd: usize, buf: *const u8, len: usize) -> isize {
    let token = current_user_token();
    let task = current_task().unwrap();
    let inner = task.inner_exclusive_access();
    if fd >= inner.fd_table.len() {
        return -1;
    }
    if let Some(file) = &inner.fd_table[fd] {
        let file = file.clone();
        // release current task TCB manually to avoid multi-borrow
        drop(inner);
        file.write(
            UserBuffer::new(translated_byte_buffer(token, buf, len))
        ) as isize
    } else {
        -1
    }
}

pub fn sys_read(fd: usize, buf: *const u8, len: usize) -> isize {
    let token = current_user_token();
    let task = current_task().unwrap();
    let inner = task.inner_exclusive_access();
    if fd >= inner.fd_table.len() {
        return -1;
    }
    if let Some(file) = &inner.fd_table[fd] {
        let file = file.clone();
        // release current task TCB manually to avoid multi-borrow
        drop(inner);
        file.read(
            UserBuffer::new(translated_byte_buffer(token, buf, len))
        ) as isize
    } else {
        -1
    }
}